The Power of Subgraphs to Access Blockchain Data and How to Build One with Alchemy
 Thomas Cosialls
Efficient data access and management have become crucial for developers building decentralized applications (dApps). As the complexity and volume of on-chain data grow, traditional methods of data retrieval are proving to be inadequate. This is where subgraphs come into play, offering a game-changing solution for indexing and querying blockchain data. In this article, we'll explore why subgraphs are essential, how they work, and provide a step-by-step tutorial on building a subgraph using Alchemy Subgraph.
The Limitations of RPC Endpoints
Before diving into subgraphs, it's important to understand why traditional methods of accessing blockchain data, such as RPC (Remote Procedure Call) endpoints, are becoming unsustainable:
- Scalability Issues: As dApps grow in popularity, the number of requests to RPC endpoints increases dramatically, leading to potential bottlenecks and slow response times.
- Inefficient Queries: RPC endpoints are not optimized for complex queries or large datasets, making it difficult to retrieve specific information efficiently.
- High Costs: Frequent RPC calls can be expensive, especially for Ethereum Mainnet, as each call consumes resources and may incur fees.
- Limited Historical Data: RPC endpoints typically provide access to recent blockchain state, making it challenging to query historical data efficiently.
- Inconsistent Data Structure: Data retrieved from RPC endpoints like Events often requires additional processing to be usable in applications, adding complexity to the development process.
Enter Subgraphs: A Game-Changer for Web3 Data Access
Subgraphs address these limitations by providing a more efficient and scalable way to index and query blockchain data. Here's why subgraphs are revolutionizing data accessibility in the Web3 ecosystem:
How Subgraphs Work
- Indexing: Subgraphs continuously scan the blockchain for relevant events and transactions, indexing the data in a structured format.
- GraphQL API: The indexed data is exposed through a GraphQL API, allowing developers to query exactly the data they need, no more, no less.
- Real-time Updates: As new blocks are added to the blockchain, subgraphs automatically update their indexes, ensuring data is always current.
- Customizable: Developers can define their own data schemas, tailoring the subgraph to their specific application needs.
Benefits of Using Subgraphs
- Faster Queries: By pre-indexing data, subgraphs can return query results much faster than traditional RPC calls.
- Reduced Load on Nodes: Subgraphs reduce the need for constant RPC calls, decreasing the load on blockchain nodes.
- Cost-Effective: With optimized queries and reduced infrastructure requirements, subgraphs can significantly lower operational costs for dApps.
- Enhanced User Experience: Faster data retrieval translates to more responsive dApps, improving overall user experience.
- Complex Queries Made Simple: GraphQL allows for sophisticated queries that would be difficult or impossible with RPC endpoints alone.
Options for Building a Subgraph
Developers can choose from several options when building and deploying subgraphs, including The Graph Protocol (a decentralized indexing solution), Alchemy Subgraph (a managed platform), or self-hosted solutions. This tutorial focuses on Alchemy Subgraph, which offers a user-friendly and fast approach to subgraph creation and management.
Tutorial: Building a Subgraph with Alchemy Subgraph
Let's walk through the process of creating a subgraph using Alchemy Subgraph. We'll create a simple subgraph that indexes ERC-20 token transfers on the Ethereum mainnet.
Prerequisites
- Node.js and npm installed on your system
- An Alchemy account (sign up at https://alchemy.com)
- Basic knowledge of GraphQL and Solidity
Step 1: Set Up Your Environment
First, install the Alchemy Subgraph CLI:
npm install -g @graphprotocol/graph-cli
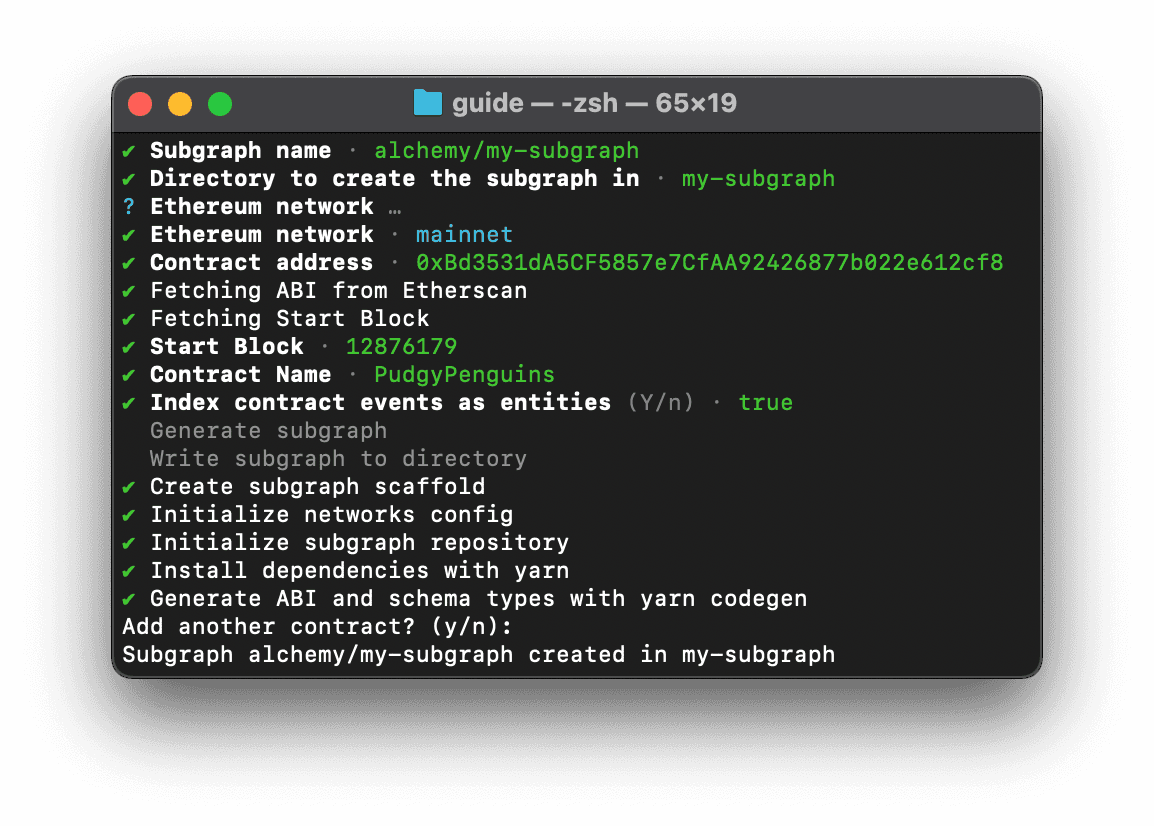
Step 2: Initialize Your Subgraph Project
Create a new directory for your project and initialize it:
mkdir erc20-transfers-subgraph cd erc20-transfers-subgraph graph init --product hosted-service
Follow the prompts to set up your project. Choose a name for your subgraph, select the network (Ethereum mainnet in this case) and the contract address you want to monitor. Make sure you are putting the proxy contract address if you have implemented upgradeability.
Step 3: Define Your Schema
Edit the schema.graphql file to define the entities you want to track. For our ERC-20 transfer subgraph, we'll use the following schema:
type Transfer @entity {
  id: ID!
  from: Bytes!
  to: Bytes!
  value: BigInt!
  token: Token!
  timestamp: BigInt!
}

type Token @entity {
  id: ID!
  symbol: String!
  name: String!
  totalSupply: BigInt!
}
Step 4: Update the Subgraph Manifest
Edit the subgraph.yaml file to specify the contract address, events to track, and mapping functions:
specVersion: 0.0.4
schema:
  file: ./schema.graphql
dataSources:
  - kind: ethereum
    name: ERC20
    network: mainnet
    source:
      address: "0x6B175474E89094C44Da98b954EedeAC495271d0F"  # DAI token address
      abi: ERC20
    mapping:
      kind: ethereum/events
      apiVersion: 0.0.6
      language: wasm/assemblyscript
      entities:
        - Transfer
        - Token
      abis:
        - name: ERC20
          file: ./abis/ERC20.json
      eventHandlers:
        - event: Transfer(indexed address,indexed address,uint256)
          handler: handleTransfer
      file: ./src/mapping.ts
Step 5: Implement the Mapping Functions
Create a file src/mapping.ts and implement the handleTransfer function:
import { Transfer as TransferEvent } from "../generated/ERC20/ERC20"
import { Transfer, Token } from "../generated/schema"
import { BigInt } from "@graphprotocol/graph-ts"

export function handleTransfer(event: TransferEvent): void {
  let token = Token.load(event.address.toHexString())
  if (token === null) {
    token = new Token(event.address.toHexString())
    token.symbol = "DAI"
    token.name = "Dai Stablecoin"
    token.totalSupply = BigInt.fromI32(0)
    token.save()
  }

  let transfer = new Transfer(event.transaction.hash.toHex() + "-" + event.logIndex.toString())
  transfer.from = event.params.from
  transfer.to = event.params.to
  transfer.value = event.params.value
  transfer.token = token.id
  transfer.timestamp = event.block.timestamp
  transfer.save()
}
Step 6: Generate Types
Generate TypeScript types based on your schema:
graph codegen
Step 7: Build the Subgraph
Compile your subgraph:
graph build
Step 8: Deploy to Alchemy Subgraph
Deploy your subgraph to Alchemy:
graph deploy {YOUR_PROJECT_NAME} \ --version-label v0.0.1-new-version \ --node https://subgraphs.alchemy.com/api/subgraphs/deploy \ --deploy-key {API_KEY} \ --ipfs https://ipfs.satsuma.xyz
Replace {YOUR_PROJECT_NAME} with your project name and {YOUR_ALCHEMY_API_KEY} with your actual Alchemy API key.
Step 9: Query Your Subgraph
Once deployed, you can query your subgraph using the GraphQL endpoint provided by Alchemy. Here's an example query to get recent transfers:
{ transfers(first: 5, orderBy: timestamp, orderDirection: desc) { id from to value token { symbol } timestamp } }
You can use the playground site generated by Alchemy to directly build GraphQL requests. Here is the playground generated for Kleek, our blockchain based event platform built during WalletConnect's hackathon.
Conclusion
Subgraphs have become an indispensable tool in the Web3 developer's arsenal, offering a more efficient and scalable way to access and query blockchain data. By leveraging the power of subgraphs, developers can create faster, more responsive, and cost-effective decentralized applications.
Alchemy Subgraph provides a user-friendly platform for building and deploying subgraphs, making it easier than ever to harness the power of indexed blockchain data. As the Web3 ecosystem continues to grow, subgraphs will play an increasingly crucial role in unlocking the full potential of blockchain technology.
By following this tutorial, you've taken your first steps into the world of subgraphs. Continue exploring and experimenting with different data models and queries to discover how subgraphs can enhance your Web3 projects.